Showing posts with label lovely DIY designs. Show all posts
;
Showing posts with label lovely DIY designs. Show all posts

Lovely DIY Designs (wk 10)


If you are new here then let me just quickly explain that Gina from AcuteDesigns and I, 
find a project to re-make based off something we find from pinterest!
To catch up on our previous posts within this series check out this link.

This week's pinspiration is restyling jewelry with nail polish.


I wanted to give my peices a fun holiday re-style so I also used
this glitter board for a bit more inspiration!


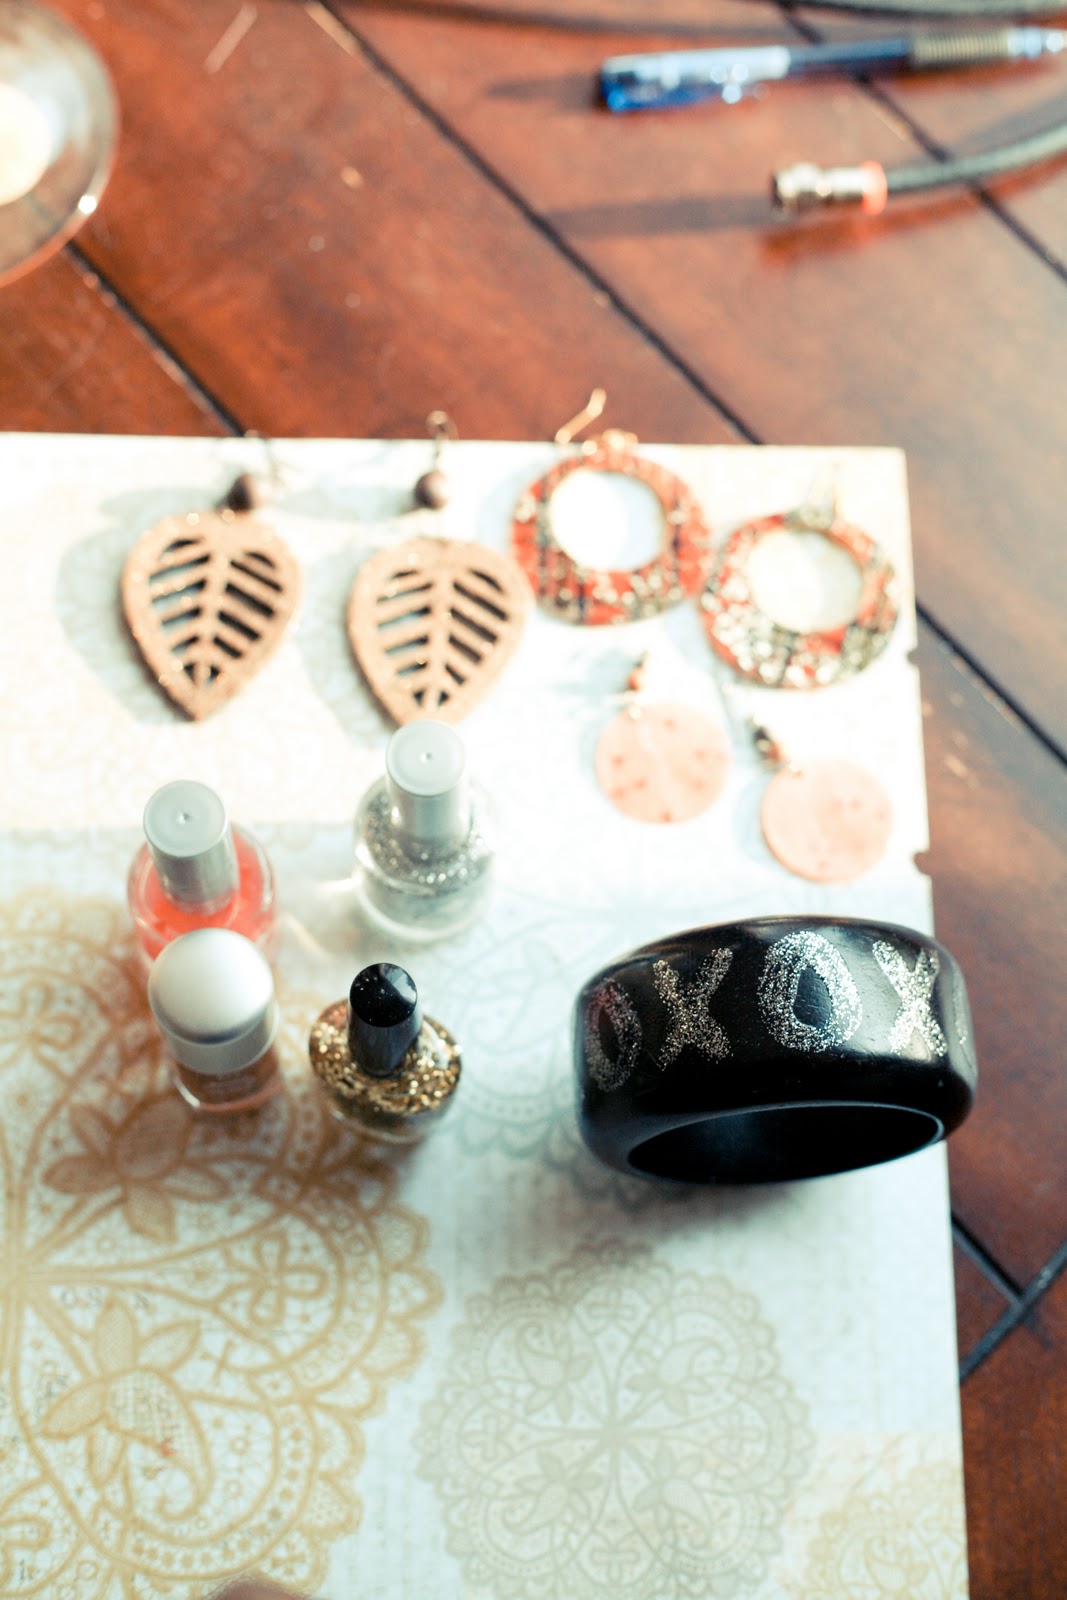
There really are only a few supplies needed for this:
-nail polish-
-clear coat sealer-
-jewelry-


I grabbed just a couple of my favorite glitter polishes
 and a few pieces of jewelry that really needed some help!
If you want to try this and don't have any jewelry to spare, 
check out dollar tree for cheapy earrings & bracelets!.


As you can tell from all my previous posts in this series, I go for easy!
Now this is way easier then painting your own nails, so I know you won't shy away.
There really is no right or wrong, no rhyme or reason.
Just paint what you want where you want!


I coated both pairs of the earrings with 2 different types of glitter.
The first pair you can still see the design through and the second pair I completely revamped
with the prettiest shade of autumn inspired gold!

If you want to try something fun and funky you can even get a bigger palette to work with, 
like a chunky bracelet and draw a design or write out a word.
I kept mine simple with a few x's and o's {love} !!


When you are finished just clear coat.
This project is an easy way to re-vamp old stuff to give your wardrobe a new look!

I'm linking up here:


Lovely DIY Designs (wk 8)


As you can tell we are on a new schedule! 
This weekly series will now be bi-weekly for the rest of the year with Gina and I.
We both have a busy holiday schedule that includes The Queen Bee Market!
(eeep we are both going to be there!!!)

If you are new to this series you can catch up on the goodness here.

Lovely DIY Designs (wk 6)

Whoa! I almost missed this! 2 days late is better then nothing, right???
Ok so no laughing at this project, my game is off this week!

Lovely DIY Designs (wk 4)


Is it that time of week again already? 
PINSPIRATION TIME
Well if you are new here then let me just tell you about our project, real fast!
Basically the super rad Gina from Acute Designs and myself love pinterest (who doesn't?)
So we put our pins to good use, and each Wednesday one of us will show you a tutorial 
based off of something that we found via pinterest.. 
so basically we put our wasted time from pinning to good use by creating!
To get caught up view week 1 , 2 & 3

Lovely DIY Designs (wk 3)


Head over to Acute Designs to see this weeks lovely DIT designss pinterest tutorial!


Lovely DIY Designs (wk 2)


In case you missed Week One of :lovelyDIYdesigns:
let me catch you up on what this is all about.
See the girl on the left.. That's me!
and that girl on the right...Gina from Acute Designs (we love her!)
We have dreamed up a fabulous weekly feature that we want to share with you.

Every Wednesday one of us will feature a new tutorial..but there's more to it then just that.
The tutorials we create are from things we pin.. um you know that slightly unhealthy obsession right?
If not, then you are missing out!
Our boards (here & here) are overflowing with pins, and our diy crafts boards particularly
are calling out to us "make me, make me"


So.. we will!


Every Wednesday we will put our spin on something we pinned.
(^whoa that last line was genius!)

WEEK TWO: Paint Swatch Bookmarks


Supplies
Paint Swatch Papers
Some sort of tie (string, twine, rope, ribbon, etc)
Hole Punch
Stamp (s)
Ink Pad

I would like to point out that all of the items I am showing in this tutorial, are things I already had.
You could go buy a specific stamp for this tutorial, but I'm showing you it with what I had handy!


I started out by laying my swatches side by side in a row,
I did this because I wanted my stamps to overlay and sort of be random as opposed
to perfectly placed, so arrange them how you would like your stamps laid out.


Ink your stamp (duh!)


Next place your stamp in the design you want, I wanted mine to look a little more on accident
rather then perfectly placed. So I just stamped a pattern so each swatch had a different look.


When done stamping I had this..
let dry or use a product like StazOn Ink Pads so you don't risk smearing.
If you are wanting something more finished, you can laminate these
 or use packing tape to seal the deal!


Next I used my standard hold punch and on the top of each swatch bookmark I punched a hole.


Next up get your tie, I used Divine Twine (love!) and coordinated the ties with each bookmark color


To make a legit tie (yep legit!)
fold in half, take the loop through the hole then take the ends through the loop and pull
..get it?


Repeat til you have them all done, and hot damn you have some cute bookmarks!


Stay tuned next Wednesday for Gina to show you something spectacular!!!

Lovely DIY Designs (wk 1)


The new weekly feature that Gina from Acute Designs
 and myself have teamed up to do, launches today!

Lovely DIY Designs
(just.lovely.things + acute designs = kick ass diy tutorials)

Every Wednesday you will see a new tutorial that we are teaching you how to do,
based off things we find from Pinterest.
(our boards are overflowing with pinspiration for us to share!!)

Today head over to Acute and see what she is up to & next week come see me!