
Some of you may not have programs that allow you to make graphics
for your blogs/shops.. and some may not understand computers.
But that's ok! There are super simple ways to make things online.
Today I'm going to show you an uber fast way to make a button,
that links your shop/blog to others (like when you advertise)
Now for more of the advanced techies out there, this may seem silly,
but it works.. its easy.. and I know it can be a help for others to make their own things.
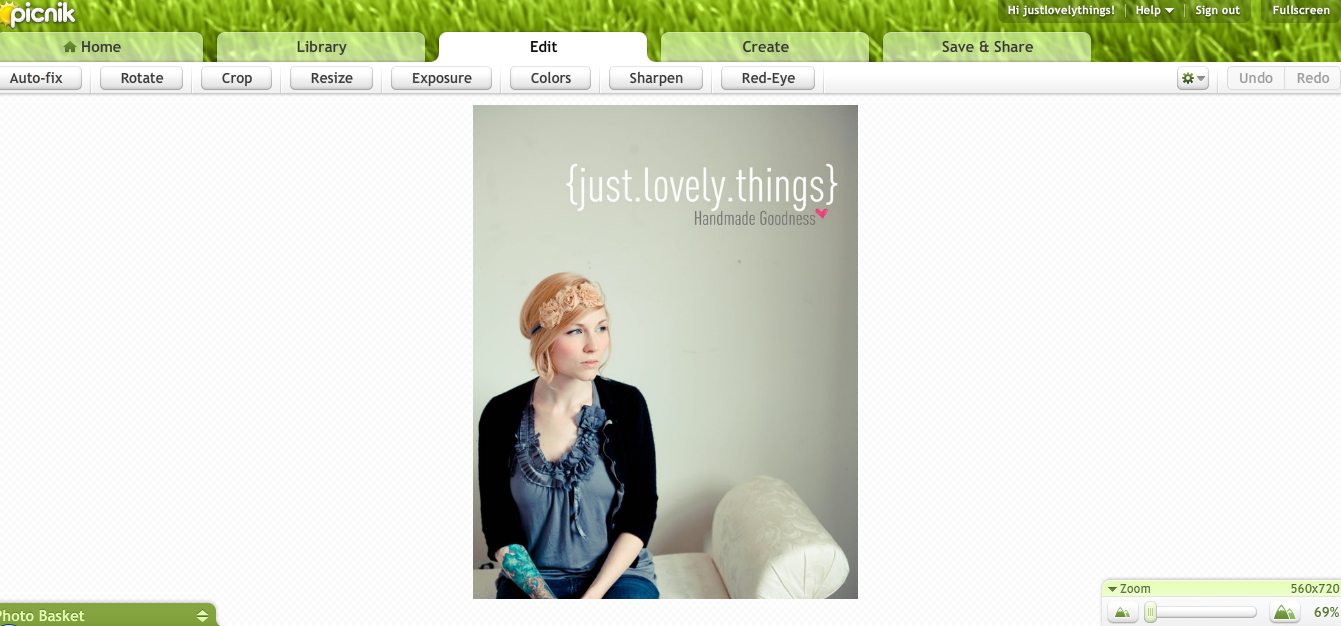
First off we are headed over to Picnik,
you can use a free membership, but I will let you know a paid one is totally worth it!

Find the photo you would like to use for your button and upload it.
It needs to be at least the same dimensions as desired button size or larger!
I chose one of my business cards that I include in my packaging,
once you have it uploaded hit the resize button in your edit menu.

When you first resize a photo it gives you the dimensions that the original is.
The first number (560) is my width & the second number (720) it my height/length.

I want my button to be a 250x100 so I'm going to change the largest number first,
which is the width to 250 (you just type that into the box)
Always start resizing with your largest number first.
As you can tell, once my largest number is entered my dimensions are still way off.
You can't just type in the dimensions you want because we are trying to keep size proportions.
So go ahead and hit the OK button. (don't worry we still have some work to do!)

Still in your edit menu you will go one button to the left of resize and select crop.
Now that you are here you will see a little highlighted box, go ahead and pull the tabs all the way out.
Meaning whatever your largest number was, take it back to that.
So since mine was my width I pull the box to the left and the right
so that it is highlighting 250 of my photo.
Next up in the smaller number box (my length, but it may vary for you!)
I type in 100 since I want my photo to be 250x100.
Your highlighted box will now be the exact size of the button you want.
Now I know that I only want to use a small portion of my original photo,
so it is ok that its not selecting everything.
But if you want more of whatever photo you upload,
then I would suggest resizing a few times to get it down to the artwork you want!
So next up, move the highlight to the position you want to use. Hit OK.
Then change from the edit menu to your create menu


Once you are in create, you have options to add text and clipart.
Retouch the image (airbrush, etc.) Add Frames and even edit the effects!
Have fun and remember if you are making a button to advertise your shop/blog
on some elses' blog.. while trying to remain true to your image, think about their blog
and make sure it goes with what their readers might be interested in!

After you add on whatever you want your button to look like.
Save it and you are ready to go!
These are so simple to make that sometimes I make a few,
and when I'm ready to submit a new advertisement
I let the blog owner decide which one they like best!

Thanks girl! Maybe now I won't have to pay for all my headers, buttons,etc.
ReplyDeleteThanks for the great tips! I have a query for your next tutorial... how about the icons for tabs on your blog. I can only get text. I have seen blogs with pictures instead of words for the tabs and I cant figure out how to do that...
ReplyDeleteGuuurl, I love picnik. I have photoshop and it has so many more capabilities, but picnik is so easy and so fun.
ReplyDeleteThat is so nice of you to post! It took me forever to figure out how to make a button and I still learned a few things from this. Thanks!
ReplyDeleteSheri
Wow hey this is a really good tutorial! x
ReplyDelete- sydsense
I've been using Picnik, it's grat. thanks for sharing!
ReplyDeletei've been following your blog for a few weeks and i wanted to stop by and say that i love it! and i agree with the person a few comments ahead of me- i love photoshop (and aperture!) but a lot of the time, i'd rather just use picnik. it's just fun!
ReplyDeletewow, thanks so much for posting this tutorial! really helpful for those of us not to Adobe Creative Suite saavy.
ReplyDeleteKristen L.
/www.lusciousjunk.com/
Thank you for such a great tutorial! I created my first button using it! :)
ReplyDeleteI LOVE Picnik! Its such an easy way to edit photos! Thank you so much for this tutorial! I have been trying to make a button for quite awhile now and I always have problems with the size!
ReplyDeleteHope your weekend was wonderful! :)
I had no idea Picnik could do so much!! Thanks for sharing this tutorial. I learned so much.
ReplyDeleteNow how do we add the little box with the code for others to grab our buttons?? Thats the part i find difficult! :-)
ReplyDeleteThanks so much for this! I've been using Picnik Premium for a while now, but never thought to use it for a button. I <3 your blog, so glad I found it!
ReplyDeleteAh this is super - definitely gonna check out Picnik to make a blog button - spent an hour an and half the other day following this really convoluted tutorial on how to make blog button hyperlinks...then realised it was totally useless and wasn't going to work; and that blogger has a widget that allows you to add hyperlink buttons to blogs!! GAH! Gonna try out your lovely tutorial to make meself a gorgeous blog button. Thank you! xxx
ReplyDeleteThis is fantastic! Thank you for sharing! New follower & loving your blog!
ReplyDelete