Showing posts with label business. Show all posts
;
Showing posts with label business. Show all posts

going after a little change

I'm a creature of change, its no big secret.  I love moving things around in my house, or moving houses! I change the color of my hair constantly, the music I'm diggin' for the week, what I'm reading, etc. One thing I felt I wasn't changing though was who I was representing online.

And that was me. Where was I, in my design?


I started reflecting upon the blogs I love so very much, the ones I visit daily, and while content was obvious- their design was what always stood out.  I couldn't put my finger on it, I even thought I was having a brand identity crisis, but it finally hit me: my design was based upon my business and not my own lifestyle.  Although that direction was great for a while and works incredible for others, my shop and my customers are not a direct reflection of me.  And I needed to change that.  I think as a business owner we get so wrapped up in what we present to our customers that it can seem like they are the only ones we make happy, when really they probably don't even notice!

Per my previous design I discovered: I am not gold or glitter, chalkboard menus, floral patterns or cute fonts.  I am not my shop, I am not my creations.  I have so many interests and one of them is the extreme passion I have to share independent and small business, handmade & local communities.  I also love to share what is going on in my life, new explorations from our big move and so much more...  I love good design and free of clutter layouts that can show off the content I so desire to share.  But I was scared of how to make this all work- especially since my designer would murder me.  Like as in we have never met in real life, but I firmly believe she would fly from Canada to Oregon and choke me out.

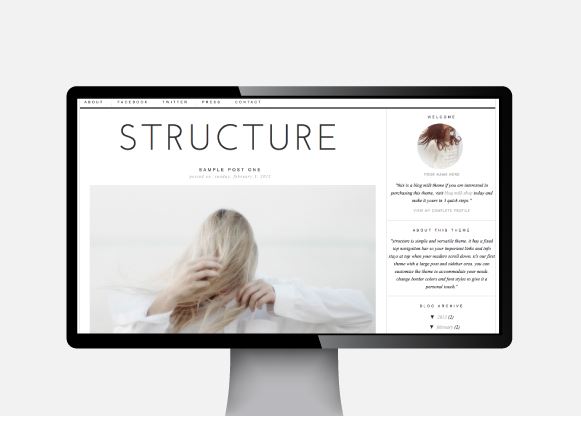
I found the design below by BlogMilk and instantly fell in love. It was pre-made, but I could customize it however needed.  I messaged Dana and told her my ideas and I was so sad, because for the first time in 2+yrs she wouldn't be designing my blog.  But change is good and although I'm not done with the design, I'm so happy how its looking so far.  Thankfully I have a rad boss with some computer skills that he puts to use at 2am his time upon request, otherwise this makeover could have been a disaster!


If something is bothering you, locate the source and make a change. Don't be afraid to be yourself, or even have a 'self' away from your business.  This community is (in my opinion) so over saturated with the same stuff that it can be overwhelming to find your own place, but there are no rules, there are no rights or wrongs.  And as little as a blog makeover may seem, to me it meant everything.  I think I'm finding me.

blog & business tax time


Its that time of year when you might question how much you love what you do.  Is your small business or blog worth the time, expense and hard work you put in to it?  For me the answer is an obvious Hell Yeah- but all sugar coating aside it takes a lot of work.  For the next month I have some amazing friends stopping by sharing advice on how to get your business in gear & in tip top shape for rest of the year! Today Helena from Sweeter CPA has some tax bits for you..


Preparing for Tax Season: Tips for Bloggers and Small Business Owners
Tax time is coming! While that may strike fear into your heart, there’s no need to put off your preparation. Here are some steps to make this tax season easier.

Step 1: Gather
In order to calculate how much you owe the IRS, you first have to get your paperwork in order. Did you work for someone else? If you were an employee, your income should be reported to you on a Form W-2. Contractor earnings are reported on a Form 1099-MISC. These forms were either sent to you in the mail or you should have received instructions via email explaining how to access them online. They were due January 31, so if you still don’t have them, you are well within your rights to call and ask!

You may have also received 1099s from your bank or financial institution. Interest earned in the past year will be reported to you on a Form 1099-INT. Forms 1099-DIV show any dividends you’ve received over the past year. If you’ve made any changes to retirement plans, you may receive a Form 1099-R.


Step 2: Prep
If you are a small business owner, your journey to a completed tax return has another step. You need to prepare your books from 2012 to make sure all your income and expense items are included. If you are using accounting software to keep track of the money you earn from or spend for your business, this step will be much easier!
1.   Make sure you’ve tracked all the income you’ve received from your business. This could have been reported on invoices you’ve sent to clients, Forms 1099-MISC you’ve received as a contractor, or receipts from sales.
2.    Be sure to keep track of all business expenses! Check out Heathers post from last year for a detailed list. You or your accountant will report these expenses in categories on your tax return, so be sure you can explain each expense.
If your accounting software allows you to run a Profit and Loss statement, that is all you will need for this step! Easy-peasy.


Step 3: Dive in!
Now that you’ve gathered the documents you need and prepped your small business info, it’s time to dive into the returns. While online tax preparation services will guide you through the process, here’s some vocabulary so you can be confident of what you are filing:
•       Form 1040 - this is your annual tax return.
•       Standard Deduction - the government allows every taxpayer a standard amount to deduct from their yearly income. This amount grows with inflation, so it changes every year. You will enter this where prompted on Line 40 of your Form 1040.
•       Schedule A - Instead of taking the Standard Deduction, you also have the option to itemize - or list out - your deduction items. These items include home mortgage interest and medical expenses (so people usually stick to the standard deduction until they own a home or have a major health crisis). You have the option of taking the standard deduction or filing a Schedule A to list your itemized deduction amounts, so take the deduction that is greater!
•       Schedule C - this schedule, also filed with your Form 1040, is where you report earnings or loss associated with your small business. The schedule goes through all your possible sources of income and expense to calculate your net earnings for the year. If you have inventory, you will detail related costs on the second page of this schedule. The net earnings (or loss) will then show up on page 1 of your Form 1040.
•       Schedule SE - Self Employed people who earned more than $400 in the past year will need to fill out a Schedule SE to report self employment tax.

Step 4: Get Help
If you aren’t confident you can prepare your taxes on your own - or if you think your time and expertise are better spent elsewhere! - reach out to an accountant. They are here to make sure you complete everything correctly and get all the possible deductions. Besides, money paid to a CPA or tax preparer is deductible on next year’s return!


the business of blogging

Hi friends!  After a week long (unplannned, but much needed) break, I'm back and really excited to share this post with you today.  If you are fans of Victoria Hudgins over at A Subtle Revelry (one of my very favorite blogs!), you probably already know about her e-course The Business of Blogging.  If you aren't then stick around to learn a little more and use a discount to sign up for the course yourself!


The Business of Blogging is a mentorship in the shape of a four week course that takes your blog and helps you turn it into a business.  With the end result of your blog becoming a profitable + sustainable business no matter your niche, this e-course presents you with the tools and know how in getting you there.

When a course is offered up by the Editorial Director of Altitude Design Summit, its something you know that will be worth it.  From personal consultations consisting of real advice from a professional blogger to assigned weekly lessons, it provides an interactive learning structure that allows you to learn about the business of blogging in a way that's catered to you.  

Its a great investment (& don't forget write off!) for your blog, brand & business that you shouldn't skip.  You and your site are worth learning about this so I hope you won't pass it up.  Will you be joining in on the fun in March?  If you sign up let me know.  Use code ALT2013 to save 10% on the class!


get your business in shape

I'm really excited to get going on a new project that I have wanted to share with you for a while now.  Later this month I will be launching a business guidance program called Shape and today I would love to chat with you a little more about it and hear what you have to say!


Have you needed a little guidance with your shop, or are you starting a business and need a helping hand with where to start?  How about taking your hard work and turning it into a brand?  That's where I come in!  With just a bit of guidance I'm going to show you where and how to turn things around and whip your business into shape!

What I need from you is just a little bit of input so I can do some more fine tuning before the launch.  I would love to know what types of things you are looking for when it comes to business!  Where to start, what platform to use for your shop, branding guides, supply resources.. whats on your mind?  If you are shy leave it anonymously and I will try to touch on it if its relevant to this program!  Thanks for your help xo

winter findings

I patiently waited for the mad rush of this last weekends sales to end (obviously I joined in and made hefty amounts of online purchases from my favorite shops), but it also gave me time to really curate items for this new collection.  I have been creating up a storm and I wanted to feature more of the foliage type of pieces, but I decided to hold off and sprinkle them in each of the updates I will be doing in the shop throughout winter.


I hit up my favorite model and friend Cameron (i miss working with you everyday!!!) to do a quick shoot up at my old photo studio.  If you can believe it we shot the entire thing in 30min & I couldn't be more proud.  When I take photos, I've been trying to shoot more intentionally.  I know with digital I can shoot a bazillion photos and then just find the right one- but instead with intentional shooting you are forced to see the image as the final photo you want to achieve.  So when I look through the lens I try to see the end product, which means I rarely crop or edit.  I try to come up with a style & back drop and shoot so it comes out exactly so.


With this little collection I have a few colors that will be marked 'coming soon' also as I mentioned I will be updating more often.  I gave the images in the front of the shop a quick face lift reflecting our flat rate shipping deal and ways to connect! 


Folks I can't stop there.. check out this look book that almost kicked my ass (seriously it took me a while to figure this out, but I taught myself a design program and did it!) and if you fancy a coupon use code 'handmade' at checkout to save 20% off all orders through Dec.10th!!! I would love to know what you think of everything.. xo

its okay to ask for help

I stay busy. Its no secret and busy is a matter of choice which I clearly make on my own. Once in a while though its nice to have a little help just to get the job done. My mom occasionally helps me with shop order shipments and Love Club assembly, but I've needed some online help and that's where Skye comes in!


Skye was (is) actually a customer of mine and somehow we started chatting and she mentioned that she does this Virtual Assistant stuff.  Well I had heard about it before, but was extremely leery of giving up any control... especially to someone I've never met in real life.

With a slap in the face by the online gods I immediately felt different when chatting with her.  Right away I wanted to be friends, I trusted her and decided to take a chance.

Holy sweet baby jesus hallelujah. Best decision ever.


- tell us a little about yourself, where you live what you do etc.

I live in Louisiana with my husband and our two fuzzy-four-legged-children but I originally hail from Texas. I’m a Texas girl to the heart! If you need proof, I’d show you my Texas flag tattoo. ;) I’m currently a full time 9-5er but I’m working like crazy to build my virtual assistant business so I can work from home starting in 2013.

- you recently launched this service, what inspired you to do this?

It pretty much just fell into my lap. I went to a blogging conference last June and met up with a couple of ladies who were looking for some help running the behind the scenes blog business. and that is really where it all started! So I guess you could say that inspiration kicked me in the behind to get things started? After a few trial weeks I decided that I could really get into this and started thinking about how to brand myself, what kind of market I would work best in, and what I could really offer as a virtual assistant.

My three spiritual gifts are administration, helps, and creative communication. and seriously, getting to be a virtual assistant allows me to share those gifts with others who NEED it. It is the most fulfilling work I have ever done. I didn’t think i’d ever find work that made me feel appreciated and validated. its quite honestly one of the best feelings in the world!

- what types of advice can you give others for better time management or organization

number one - develop a system that works for you. If you are a serial paper piler, a file folder system will never work to organize you. You will just have piles of file folders everywhere instead of paper. Think about how your brain organically works and come up with a system that works in its favor. It might take a couple of tries but if you organize in a way that naturally fits your other brain systems, it will work out better in the end and you are more likely to stick with it.

number two - take breaks! I get bug-eyed with highway hypnosis if I stare at the computer too long and it gets really hard for me to concentrate on what I’m doing. therefore the work I’m doing is worthless and I’m not managing my time well. When that feeling starts to hit I take a break from the computer altogether and walk outside. do the dishes. fold some laundry. throw the ball for my dogs. just something to give my eyes and brain a break!

- what types of services do you offer as a va

I really focus on helping out bloggers, handmade business owners, and online business owners - so any services that help them run their businesses better I can do. Format and edit posts, watermark pictures, update inventory in your shop, create branded documents and newsletters, manage sponsors, giveaways, and guest posters - that is really the short list. My mission statement is to offer services to bloggers, artists, creatives, and business owners so they can spend more time creating and less time doing! :) any help you need in those categories is what I can offer. and if I don’t know how to do something, I will figure it out!


We've worked together for about a month now and although I've been so busy I can barely send jobs over for her to do, she still represents my company in the best way.  Skye helps me manage some of the emails that need a response, but not necessarily a response from me.  She is my new part time project coordinator and I can't wait to use her more often- in a good way of course.

Trust me handing over things is tough.  My advice is to think about the things that you can let go of or even the things you hate to do- why use your time on those things?  Pass them along and that extra time you gained can be used for so much more.

Business stuff aside, we text and totally give each other belly shaking giggles.  She is funny and so easy going... hello her business packages are named after Mexican food.  That's legit.

Skye McLain- Virtual Assistant
Mention that I sent you & take $10 off any package!
(excludes just the scoop 2hr mini's)


good reads for blogging & business

Yesterday I participated in an advice series with Maggie from Gussy Sews (view posts here & here) which really got me thinking about how much advice and how many resources are out there!  In the posts, we asked some savvy lady friends to chime in with advice on what works for them and how they manage to - or try to- do it all.  For even more business advice check my IndieBiz section that I try to keep full of useful info for you.

Today I want to share reading resources with you, which I have done before, but just wanted to remind you again of whats out there and add in a couple extras for you literate loves.  The internet is a never-ending-source-of-overwhelming-information, so sometimes its nice to close all that down and just sit down with a nice book.  


Blog Inc. by Joy Cho of Oh Joy! isn't available until Sept 19th 
(pre-order here

With roughly 95,000 blogs launched worldwide every 24 hours (BlogPulse), making a fledgling site stand out isn't easy. This authoritative handbook gives creative hopefuls a leg up. Joy Cho, of the award-winning Oh Joy!, offers expert advice on starting and growing a blog, from design and finance to overcoming blogger's block, attracting readers, and more. With a foreword from Grace Bonney of Design*Sponge plus expert interviews, this book will fine-tune what the next generation of bloggers shares with the world.

Blogging for Creatives by Robin Houghton 

Covers everything creatives need to know about how to design a beautiful, interesting blog that people will want to return to again and again--such as how to design, publish and host a blog, as well as keeping it fresh, staying motivated and forging connections with others in the field. Professional advice is highly illustrated with examples of successful blogs, broken down into succinct types that work, helping the reader to identify and develop the style of blog they want.


Creative Inc. By Meg Ilasco & Joy Cho 

As the hipster classic Craft, Inc. did for crafters, this book will teach all types of creatives illustrators, photographers, graphic designers, animators, and more how to build a successful business doing what they love. Freelancing pros Meg Mateo Ilasco and Joy Deangdeelert Cho explain everything from creating a standout portfolio to navigating the legal issues of starting a business. Accessible, spunky, and packed with practical advice, Creative, Inc. is an essential for anyone ready to strike out on their own.


This action-oriented take-along planner is packed with advice and worksheets that guide creative entrepreneurs in their hot pursuit of profit. From big picture goals (writing a mission statement, developing marketing campaigns, launching a new line) to immediate to-dos (getting a business license, pricing products, packing for trade shows), this essential guide brims with how-to tips from industry experts. Roomy pockets catch important business cards, while tear-off notepad pages offer space to jot thoughts on the go. The lay-flat portfolio packaging makes this planner both easy to tote and durable enough to withstand all that the bumpy road to success may bring.


The Handmade Marketplace breaks down and makes sense of the global possibilities for marketing and selling crafts. First, determine the right price for every item — not too expensive and definitely not too cheap. Whether the product is beaded jewelry or felted slippers, illustrations or tote bags, author Kari Chapin helps crafters determine cost of goods, market competition, and the pros and cons of wholesale and retail sales. If the price is right, customers will buy. Then it's on to selling. The boom in indie craft fairs and sites such as Etsy ("Your place to buy & sell all things handmade") is providing artisans with an ever-expanding marketplace for handcrafted items. Chapin demystifies every venue. She explains the guidelines that craft fairs impose on exhibitors, the typical yearly calendar of shows, and how to start a new craft fair.


Are you ready to make a living from your craft? Applying her trademark "you-can-do-it" coaching style to the nuts and bolts of business planning, Kari Chapin covers all of the issues involved in turning your creative hobby into a successful business--from mapping out a business plan to expanding production and distribution, finding funding, and addressing legal matters. With this definitive guide, you'll discover how to grow your business beyond the dining room table and finally quit your day job.


Handmade to Sell by Kelly Rand

• Developing successful product lines
• Copyrights and trademarks
• Taking perfect product shots
• Using analytics to boost your online sales
• Selling at fairs, shows, and other retail outlets
• Diversifying income through licensing and teaching
• Hiring and outsourcing
   And more...
EtsyPreneurship by Jason Malinak

Most Etsy sellers are confident in their crafting and artistic capabilities. However, many need guidance on the business-related intricacies of starting and maintaining a successful Etsy business.Etsy-preneurship helps existing and potential Etsy sellers understand the business fundamentals needed to become a small business owner on Etsy, including taxes, bookkeeping, marketing, finances, administrative tasks, daily operations, legal requirements, business plans, and improving your business skills. This book will help you make the jump from enjoying your handmade/craft/art hobby to running a profitable business.


The Craft Business Handbook by Alison McNicol

Wish you could turn your talent for making lovely things into cash? Bored of the 9 to 5 and dreaming of starting your own crafty business, but not sure where to start?  From setting up as a proper business, producing and pricing your goods for maximum sales and profit, to the various options for selling online, at craft fairs, trade shows and getting your products into retailers, right through to gaining magazine coverage, promoting your business online and managing your business as it grows, this is THE essential guide for any would-be crafty entrepreneur!

Digital Art Wonderland by Angi Sullins & Silas Toball

Creative techniques for inspirational journaling and beautiful blogging.


-----------------------------------------------------------------
what are you reading??

Have any of these made it onto your list? Let me know how you like them..
or tell me some of your favorites!

*all book desciptions via amazon.

setting up shop


Waddup Just Lovely readers! I'm Leonora from Yellow Heart Art. I'm a graphic designer who started Yellow Heart Art back in January of 2011 as a way for me to be my own boss and be 100% creative. Unfortunately at my corporate full time job I don't get to be very creative (there is only so much one can do with slate gray…) My shop is full of quirky typography art, fun plushes and pretty rad-o necklaces.

Heather was super stoked to find out that I was going to be a vendor in Renegade Craft Fair(if you're unfamiliar with Renegade you guys can get acquainted right over hereShe asked if I could write a post about how one prepares for a craft fair. Obviously the answer is apparent here.

you panic.

No, just kidding.

Kinda.


PROCRASTINATION BLOWS
Don't let the months leading up to your craft fair fool you. You might think"eh, its 2 months away, mama's got this". Well, I got news for you. Mama don't got this. The worse thing you can do is put off and procrastinate getting inventory together for your show. I found out I was accepted to Renegade back in May. That meant I had almost 2 and a 1/2 months to prep for the show, and that is exactly what I did. I dedicated at least 5 days a week to slowly prepping and building up my inventory. Which was great for when I ran into hiccups.

You know what hiccups I'm talking about. For me some of my hiccups was realizing that some of the clear protective bags that I had bought for my plushes didn't fit on some of them. Since I had started to make my inventory early enough in the game I was able to quickly order more supplies online and wait for them to show up. The sooner you start to do things the less stress out you will be when you need to quickly trouble shoot and fix a problem.

PLAN OUT YOUR LAYOUT
When I got to Renegade I was only given 2 hours to set up. Again 2 hours sounds like a long time but this was 2 hours to park the car, unload everything, set up my tables, tent, logo header AND all my inventory. Bub was so patient with me, our apartment looked like a scene from hoarders.

One trick I did which helped saved me a ton time wise was by arranging my table lay out ahead of time. Now maybe some of you have a perfectly clean 6' banquet table chilling in your home. I, unfortunately do not. I'm in an upstairs apartment and homegirl was not about to schlep some 6' table up and down those stairs.

Instead I got creative. I took some painters tape and made a banquet table size box on the floor. This allowed me to lay out all my products with out using an actual table. When I was happy with the set up I took some super ghetto fabulous photos of it to use as reference when it came time to setup at renegade.

(see? ghetto fab at it's finest)

I AM SO HAPPY I DID THIS. My stress level was THROUGH.THE.ROOF come the day of renegade, 2 hours to set up turned into 1 hour, then 1 hour into 15 minutes. Not having to have to THINK about where to set up everything was a LIFE SAVER.

 
                             (my set up the day of, not too far off from said ghetto fab photo)


WRITE DOWN WHATS IN THOSE BOXES
Bubs has an obsession with these things called pelican cases? I dont know, they are these super weird industrial type looking luggage things and we are always those people that get "randomly picked" at the airports for a bomb search. These cases are HUGE and you can have a dance party on top of these cases and your stuff will be protected.

Anyway, I'm getting off topic here, but I have found using luggage to haul your inventory back and forth is way more efficient than just cardboard boxes. Luggage has wheels and holds A TON of stuff. I also took a piece of 8x10 paper, taped it to my luggage and labeled each luggage "A, B, C & D". I then wrote down what all my supplies were in A, in B etc so that the day of the craft fair I am not frantically going through 4 suitcases not knowing what is inside of them.

SHOW YOUR PRICES
Ok, so I learned from my own mistake here. I had graphically designed all these super cute mini "plaques" describing how I made my products, I then put my price in a circle in the upper corner of the plaque. I did this for all my products (my prints, plushes and necklaces)

(I thought it was funny...)

Unfortunately somehow the day of Renegade I could not for the life of me find the wood necklace plaques. I started to freak but thankfully Renegade gave us all "vendor kits" at the start of the show. In the kit was a tiny 4" x 4" chalk board. I quickly scribbled how much the wood necklaces were on the board and plopped it down.

Let me tell you, not one single person asked me how much my wood necklaces were, but I was CONSTANTLY being asked how much my plushes, vintage keys and prints were. Turns out just having a giant "$30" sign was more noticeable than me trying to be all cutesy and fun with my description plaques. So if you can, I would just keep it simple and make one giant sign of how much your inventory is.

TALK TO PEOPLE BUT DON'T BE FORCEFUL
Think about it, when you step into Macy's do you like hearing "DO YOU NEED HELP WITH ANYTHING?!?!"  the SECOND you walk in the store? No, you don't, because you didn't even LOOK around Macy's yet to see if you even need any help.

Whenever someone came into my booth I just did a simple "hey how ya doing?" with a smile. If someone wanted to take it further and ask a question they did, if they just wanted to look around they did a "Im good thank you" back and continued looking.

I was never pushy and never once tried to "sell" my product to people. People know what they like, they dont need YOU telling them your stuff rocks. Let your product speak for itself. Let the customers feel like people and not just like "dollar signs" in your eyes.

INVENTORY
Ok, I totally effed this one up. I had never done a craft show before, and I knew Renegade gets a TON of foot traffic. So I had asked other people who had done craft fairs before about how much inventory to bring. I got the same answer from everyone "bring more than you think you need".

Ok, so I took that to be "awesome i'll take what I think I need and then double it"

WRONG.

The problem was, I offered SO many different products. I had prints, plushes and necklaces. All of them ranging in a ton of styles, colors and sizes. So I went completely nutso and brought with me about 200 plushes, 100 necklaces and 100 prints.

Umm, yeah don't do that.

When doing a craft show just bring SOME of your products. You don't need to show the world ALL you have to offer (oops). Let me put it to you this way, if I do this again I will only bring 50 of each product as opposed to 200 and 100. I have about 30 prints for sale in my shop but only brought with me 11 designs to the show.


RAN OUT OF STOCK
If you happen to run out of items its ok! On Renegade's website they have links to all the vendors going before hand so people can check out whose going. Some people saw my shop online and found my booth that way. They had found a print of mine online that they liked but noticed I wasn't selling it in person at my booth.  I gave them my card and said for them to etsy convo me what print they wanted, and as an apology for not having it here in person I'll offer a discount.

People were more than happy with that and every single one of them pulled through and contacted me via email. I even had one guy ask me if I made retro TV plushes, I told him I didn't but for him I would. We exchanged cards and I hooked him up. It's all about thinking on your feet.

THINGS THAT YOU DONT THINK ABOUT-
here is a small list of things that tend to get overlooked 
when you are prepping for a craft show 

• Bring a cooler full of food and water. I was out in the sun at Renegade Craft Fair from 9am - 7pm. I brought with me 3 sandwiches and about 5 bottles of water. There is nothing worse than taking your hard earned craft fair money and spending it on a 6 dollar bottle of water.

• Have someone come with you. Think about it, nature is going to call eventually, you're going to NEED someone to watch your booth for you!

• Bring a ridiculous amount of business cards. I placed mine in piles at the corners of all my tables. I must have given away at least 500 cards

• If its outside bring an umbrella. Not for rain, but to protect you from the sun! Unfortunately for about 4 hours I was in DIRECT sunlight and got the worse dehydration ever. I wish I had brought an umbrella with  me

• Prepare for rain or wind: My craft fair was outside and this huge gust of wind came by and took out about 1/2 the booths. Anchor everything down and have a back up to prevent your items from getting ruined.

• Bring "handy wipes". Unsure if your craft shows is indoors or outdoors? Mine was outdoors so the only thing they had for us to use were porta potties. I am so happy I had sanitary wipes with me so I can touch the door handles with that and not my bare hands. *also handsanitizer since you will be shaking hands & handling moola!

• Protect all your products with "clear bags". I had put all of my plushes in clear bags so that if anyone wanted to touch them they wouldn't accidentally get any of my plushes dirty with their hands. Nothing worse than not being able to sell something since it got damaged at the craft show.


• Pre-package your products before hand. All my necklaces were all nicely tucked away in clear bags with a fun "graphic" stapled up top and a business card tucked into it. I left out one of each necklace on the display table for people to touch and try on. Once they purchased a necklace I put back the "display model" and handed them a pre-packaged necklace instead.


• Don't waste money on "cutesy marketing". I came reeeeeeally close to blowing a couple of hundred bucks on some custom made "Yellow Heart Art" plastic shopping bags. I originally thought to myself "Wouldn't it be cute if people walked around with Yellow Heart Art bags? Its like free advertising! And plus I'll feel super legit like bloomingdales!" Since I was already spending so much on the craft fair I opted to not do that. Instead I went to my local grocery store and hijacked some shopping bags. In the end only about 10% of the people buying products from me actually wanted a shopping bag. Save your money for more important things.

• If you have a giant banner for your shop do NOT hang it on the front table. People are always standing in front of tables. Instead try to hang it up top of your tent or hang it up high behind you. You want people to be able to read your shop name clearly.


• Bring a ton of change and get a Square account. Square is a service that allows you to take credit card payments on your phone. Do not get suckered into buying a square its 100% free. *paypal also offers a version based of squares idea, however there are fees.

• Bring sunscreen if its outside!

• Bring extra "supplies". I brought extra chain, claps and jewelry pliers so I can fix any necklaces issues. I also brought with me a needled and thread in case my plushes needed any repairing. You never know when something might come up!

• Know your audience. Sometimes things that sell well online will not sell well in person. My "I make pretty things all day" print is a HUGE seller of mine on Etsy and I think its because other handmade shop owners who also have an etsy account are purchasing it. That doesn't necessarily mean that my customers at Renegade craft fair all have a shop of themselves, most of the shop owners were there selling their own stuff! So I opted to not sell that print at the fair.


I hope I was able to help a little bit! I guarantee I missed some stuff, but this should hold you over for now :)

If you wanna be in touch you can reach me over yonder (side note: yonder is a word not used often enough, lets make the word of the day "yonder". use it, love it, be it)

[shop] [blog] [tweet] [facebook]

yummy yummy passion fruit!

*I implemented PassionfruitAds the day after they launched, however I will try to update this start up guide when new info is available! (last content update 08/06/12)*

Sometimes I fall so in love with something it's hard to get me back up, this is the case with Passionfruit.  If you are a blogger who currently offers advertisement spots then you.need.this.... like yesterday! My blog schedule was just made so much easier by implementing one tiny program into my life.


I first came across the cute little Passionfruit ads on Mandy's blog, then on Danielle's blog I think in Dec/Jan.  There wasn't much info given when I found them so I joined the emailing list and started following via twitter. Then yesterday something amazing happened.

They launched.


One concern I have heard from others is if this will take away from the personal interaction you have with your advertisers.  For me not so much.  Personally I still send out an email to them thanking them for their purchase, letting them know I can't wait to work with them and of course we chat about their feature.. so of course you will still interact with them, this just makes things easier because you never have to get buttons & urls in email or set up html codes again for sponsors!  Basically no more headaches before the ad even starts!

I'm going to share with you a quick start up guide on how to get you hooked as well.  First you obviously need to head over to Passionfruit and sign up, there's nothing stopping you from at least trying it right? 


From my dashboard I can quickly see the ads I have running or about to run on other blogs and the money that is coming in. I click on the 'jump to:' where is has my blog name (on the right) and get taken to where the magic happens!


Bam! This is where you can do everything. Now if you already have ads on your blog this is what I suggest you do first to make it super easy on yourself.

Go into Site Setup and define your Ad Spots.  You will put in each ad size you have individually here.

So for my large size I have 5, I tell it what size they are, how long they run,  if I want them to be on auto rotate (shuffle) and how much the price will be. -we will talk prices in a bit!- now you need to import your other ads before you publish.


If you currently have advertisers on your blog you need to move them over to Passionfruit.  Once you get your current ads in, this program does the rest for all future ad spots!

Go Import an Ad.  What I did was just save my current advertisers button images and open their link in a new tab.  This gave me their most current graphic button and their direct link (which you just need to copy/paste)


You have just 5 simple steps to do here:
  • Ad Spot - remember those ad spots you just created?
    Choose the size appropriate for the ad you are importing
  • Banner - upload their button image that you already have
  • Link - if you opened a direct link from your page just copy/paste the URL here
  • Start Date - when did their actual ad start? Put that info here
  • Quantity - how long do your ads run? Mine are 30 days so go choose your duration based on what your ads run for, which you chose in your Define Ad Spots section.


See this ad was entered in no time and I was able to put all of my ads in so quickly.  When you are in your dashboard you have a visual of the graphics, the direct links and when they expire!  They are also in order by size.


Now that you have your ads all entered and you defined how many spots you offer on your blog,
you will need to set up shop!

Let's go get your current spots up and posted!  You will need to go and delete the current ad code you already have on your blog, I was nervous so I copy & pasted mine in a word doc first ha. In the Site Setup Menu choose Displaying Ads and in your blog design add in a new html gadget and paste all the codes in there in the order you want them to appear (lar-med-sma.. etc).  They will probably be all mashed together so if you want a tiny space between them go enter this code into your blog CSS. Where is says 'px' put in a number usually from 2-5 for a good little space.. I have 5.

.pf_ads span { 
display: block; 
margin-bottom: 5px;
}

So your ads should be looking all kinds of pretty just like before in their appropriate spots if you did the code right, and if you chose 'shuffle' in the define ads section then they will auto rotate per page load.

Now you need to sell the other ads you have remaining! In the same Site Setup Menu click on Ad Shop and you can move your ads around how you want them to appear on your blog.  Next up grab that html code (step 2) and place it on your 'sponsor' info page on your blog (wherever you keep that) and you are ready to sell spots!  


As you can see it tells your advertisers how many spots are available and if any are sold out it gives them the next opening so they can purchase! Ummmmm am I saying that you no longer have to send Paypal invoices  Yes.  And am I saying that you no longer have to tell people your Paypal email to send you money? Yes.


Passionfruit charges just $1 per ad plus the charge from paypal that you usually always see in ads. For $1 you are getting a secretary, bookeeper, office filer and computer savvy html assistant.. its worth it.


So once your advertiser decided on purchasing an ad with you & they pick the size they want, they will be taken to this 'Buy an Ad' screen.  Cool right? Its streamlined and professional.  What they will pay and the start date is located on the left and all the steps they need to take to get the ad to you are on the right.  They do the work to ensure that the button is sized right, the link is directed correctly and the payment is made!  No more emailing back & forth to get button images, html codes, payments.. its all done here for you, resulting in perfectly placed ads with no mistakes!... Are you falling head over heels yet?


Once the ad has been purchased then you will receive an email saying you have a new ad! From your dashboard you can see it in your Ads Awaiting Moderation section.  It gives you all the details and you have to approve it before it goes live.  This is great because you can see the direct link, you can see the artwork (& if you require any design changes) and if the purchaser isn't a great fit for your blog this is also where you can deny the ad and a full refund is given to the advertiser!

Now you want to stay on top of this because Passionfruit is a smart cookie and knows when your ads will run, however it is up to you to approve the ads!  If you make a client wait for approval it may seem like you don't like them (boo!) so go approve those ads, if you have spots open now they will start right then and there because they expire however many days after the start date based on your duration settings. So if you aren't approving right away and they paid to start today you may have to adjust their start date to give them the appropriate amount of days they purchased. However if you don't have a spot open for a bit then after you approve them, Passionfruit mosies them on over to the 'upcoming ads' section on your dashboard so you know who will start soon!


Now there is one adjustment you might have to make to all of this and that is when you have your ads start/stop (duration).  I currently have them start on the first of each month and end on the last day, but with Passionfruit they start if you have something available (this might change though!)  So here is a trick to bypass this if you want to keep them in the 1st-last format.

-- limit the amount of ad spots you offer to currently reflect what you have on your blog, put all their start dates at the last day of the previous month so anyone visiting your sponsor section sees that all your ads aren't available til first day of the next month if you have it set up as a 31 day duration.  They can purchase an ad and it will state at checkout that it won't start til there is space (1st of month). You approve the ads and they will queue up in your 'upcoming ads' section. 

Really I think that letting spots be open at anytime for purchase if available is great because it means that you constantly have fresh content, your group sponsor features don't have to be so large and you can randomly introduce some newbies.. the choice is yours!

So now that you have all your ads switched over, you are selling ads on your blog and you are seeing what ads you need to approve how about a few extras?  Well since this project is still a baby I can promise you that MANY things are being added to it, Jason is open for suggestions and already has so many plans for updates (yay!)

Two features I'm already loving are the Cash Money Menu and the Promo Codes.


If you like to stay organized and see how much of your income is coming in from just the advertisers (because in paypal you see both ads & sales stuff if you own a business) then this is another perfect program for you!  You can view all pending payments (released every friday) plus all payments ever received which makes bookkeeping a no-brainer!


You can also add in promos.. I offer all my current advertisers 15% off when they return to me & occasionally do ad specials.  So you can offer discounts there, or if you run an 'advertisement spot' sale, this is perfect for that.  Do you offer trade (I made an example above)?  Keep those streamlined too, have your trade sponsors enter in a special discount code so that the ad is still organized with all your others, but free!  And its easy to import affliate codes if needed.  Gahhhhh the possibilities right?!

You can also manage ads that you have purchased through Passionfruit, this is great because you can update your button and url link when you need to without having to wait for the blog owner to do it!


So this is the run down on how to get started... seriously sign up, fall in love & make a million babies with Passionfruit asap.  I already got a couple friends (like dana) started on it so I hope my pimping out strategies work!  Don't forget to check out the new directory to find new ads to follow or advertise with.

If you need any help or have questions, please leave a comment below, use the help option on their site or send Jason a direct message via twitter @passionfruitads

*this is an honest review, in no way was I compensated for this post by Passionfruit or their partners, although Jason totally adores me and will most likely hire me someday hahaha jk* <-- officially hired on 08/06/2012 =)